From hot glue guns to X-acto knives, there are a number of essential items that every crafter should always have around for their DIY home decor projects. You're surely already the king or queen of versatility when it comes to your creative creations so, make sure your supplies are up to par. Enter your new secret weapon. Mod Podge.
Every Pinterest fan and craft guru has heard of mod podge, but it's truly a craft supply that wears many hats - your ultimate all-in-one. Need a reliable glue? Have any sealing needs? Want that glossy-finish? Mod podge is your answer - and it's not just for you. Mod podge is even great for your craft-loving kids. But before I start to sound any more like a running advertisement, here are some awesome home decor craft ideas to get the ball rolling. Stop reading and just get out there and get creative!
Wednesday, May 22, 2013
Rustic DIY Shelf
As most of my posts suggests, you would be really surprised what a little creativity and upcycling can do in terms of home decor. Not only are you saving big bucks by recycling junk, you're guaranteed to house some unique one-of-a-kind pieces. Here's one shelf that's just as sturdy and stylish as their pricey counterparts.

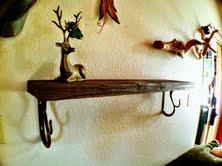
We used the same leftover pieces of redwood
that we used in our "Fisher" wedding gift.
After we stained and sealed the wood, all it took was one quick trip to the hardware store for shelf brackets and nails. Redwood is nice color and style-wise because it's simple yet adds a rustic touch to any room. Most major hardware stores carry a wide variety of brackets so feel free to add a personal touch to your shelves with color and style. We chose a simple set of black brackets that also has an added hook feature for hanging small purses or necklaces.
Similar items easily run in the $200's and are often painted to look "old" or "rustic". Upcycling old junk ensures that you'll get that genuine rustic look every time. Get creative!
Sunday, May 12, 2013
Upcyling a 100 year old Treasure
My boyfriend works for his family's construction company and often comes home with a lot of cool scraps and treasures from the homes they work on. We're both a big fan of upcycling so those scraps usually always get reinvented into something new. To us, upcycling not only supports sustainability, but it often yields a lot of cool rustic looking home decor pieces.
We love going into cool furniture stores like Pier 1 and Pottery Barn but are usually always appalled by the high prices. While we love the style of furniture they have, we like trying to recreate them for a fraction of the price. The best part? While most of their furniture has been painted to look older, we find the true joy is in the treasure hunt for really unique older pieces that actually show true signs of wear and tear. Enter the 100 year old windows.
After a long day of renovation on a local home, my boyfriend and his brother came home with twenty run-down windows. I assumed they were just scraps headed to the dump but was pleasantly shocked to find out that they were in fact 100 year-old windows torn down from a old house in Alameda, Ca. The paint was visibly chipping on every window and every imperfection just added to the true value of these windows.
We decided to add a sheet of burlap on top of a square piece of cork board. We secured it onto the back of the window and created an upcycled picture frame/cork board.
.jpeg)
The best thing about burlap?
All it takes is a simple black Sharpie and it gives it a burnt or branded look.
This picture frame is cool because of its cork board backing. Now you can easily change and mix your photos without going through the hassle of sizing or measuring. We sealed the wood frame to ensure that the chipping paint would stay in place and to preserve the rustic look. The possibilities are endless so think twice before throwing out old junk!
Homemade Wedding Gift - Part 4 of 4
TAH-DAH!


300 nails later, we have our final product! Not to mention two very happy newlyweds.
We knew our friends were moving into their new home a month after their actual wedding day so we waited to give them our handmade gift. The day of the big move, the happy couple asked us and a group of close friends to help out. After unloading the last of the boxes into their garage, we all gathered in their brand new, freshly painted kitchen for lunch. The parents of the bride and groom were also present for moving day so as the whole group finished up their sandwiches, we knew it was the perfect time to present the gift.

Earlier in the day, I posted a Facebook photo of the gift wrapped in a bed sheet to announce that our wedding gift would finally be delivered to them and challenged them to take some guesses. Completely stumped, our friends were even more curious when they saw us both carrying in a large heavy object. With their closest friends and family members by their sides, we revealed our DIY wedding gift.
After seeing the large pile of wedding gifts the bride already set aside to return, my boyfriend and I were both relieved and ecstatic that she was speechless. With some teamwork and a lot of love, we were able to create a memorable DIY wedding gift our friends will always cherish. The piece now hangs proudly on the wall of their living room and adds a great rustic touch to their new home.
Want to give your newlyweds a wedding gift they will never forget? It's easier than you think! Just roll up your sleeves and get creative!
Subscribe to:
Comments (Atom)